Showing posts with label Desserts. Show all posts

Sunday, April 1, 2012

Citrus Cakes

It's Spring(ish) time here! How do we celebrate it? With cake, of course! 


Actually, I was gonna make a blueberry / lemon loaf recipe I found on Pinterest, but I decided not to do the blueberries since I only bought enough of those to use in my morning shakes, lol. So, I opted out of the blueberries and made mini "brownie" size cakes with my new Pampered Chef Brownie Pan


Here's the recipe I used:

For the Loaf:

  1. 1 1/2 cups + 1 tablespoon all-purpose flour, divided
  2. 2 teaspoons baking powder
  3. 1/2 teaspoon kosher salt
  4. 1 cup plain whole-milk yogurt (I used Greek yogurt)
  5. 1 cup sugar
  6. 3 large eggs
  7. 2 teaspoons grated lemon zest (approximately 2 lemons)
  8. 1/2 teaspoon pure vanilla extract
  9. 1/2 cup vegetable oil
  10. 1 1/2 cups blueberries, fresh or frozen, thawed and rinsed
For the Lemon Syrup:

  1. 1/3 cup freshly squeezed lemon juice
  2. 1/3 cup sugar
For the Lemon Glaze:

  1. 1 cups confectioners’ sugar, sifted
  2. 2 to 3 tablespoons fresh lemon juice
Directions:

  1. Preheat the oven to 350 degrees F. Grease bottom and sides of one 9 x 5-inch loaf pans; dust with flour, tapping out excess.
  2. In a medium bowl, sift together flour, baking powder and salt; set aside.
  3. In a large bowl, whisk together the yogurt, sugar, eggs, lemon zest, vanilla and oil. Slowly whisk the dry ingredients into the wet ingredients. In a separate bowl, mix the blueberries with the remaining tablespoon of flour, and fold them very gently into the batter.
  4. Pour the batter into the prepared pan and bake 50 to 55 minutes, or until a toothpick inserted in the center of the loaf comes out clean. Let cool in the pans for 10 minutes before removing loaf to a wire rack on top of a baking sheet.
  5. While the loaf is cooling, make the lemon syrup in a small saucepan over medium heat. Stir together the lemon juice and sugar until the sugar is completely dissolved. Once dissolved, continue to cook for 3 more minutes. Remove from the heat; set aside.
  6. Use a toothpick to poke holes in the tops and sides of the warm loaf. Brush the top and sides of the loaf with the lemon syrup. Let the syrup soak into the cake and brush again. Let the cake cool completely.
  7. To make the lemon glaze, in a small bowl, whisk together the confectioners’ sugar and 2-3 tablespoons of the lemon juice. The mixture should be thick but pourable. Add up to another tablespoon of lemon juice if the mixture is too stiff. Pour the lemon glaze over the top of each loaf and let it drip down the sides. Let the lemon glaze harden, about 15 minutes, before serving.
Yields: 1-9x5 loaf
Note:
  1. This recipe will also yield about 12 standard muffins or 36 miniature muffins, baking time adjusted.
  2. It could be doubled and baked in a well-greased and floured bundt pan, baking time adjusted.
  3. This recipe could also be baked in an 8-inch square or 9-inch round, to create a thin cake (approx. 1 1/2 inches tall), baking time adjusted.

In terms of cooking it in the brownie pan, I used the Medium Scoop (Pampered Chef, of course) to distribute the batter. Then I baked it for 15 minutes at 350*. I followed the rest of the instructions regarding the syrup as well as the icing part and here's how they came out: 


They were a massive hit and all disappeared within a few hours of making them! Yeahhh!! So if you're a lemon lover, you should definitely make this! I attempted a second batch today, but with oranges rather than lemon since Eric isn't a fan of "the yellow things". They're still just as tasty, but the orange flavor is very mild compared to the lemon. I suppose that could be considered a good thing, but I like tart / sour stuff. 

Anyway! These little cakes would be wonderful for a little get together, or as one of my friends suggested...a tea party :)

Sunday, November 27, 2011

Lazy Sunday

Well, it's definitely a chilly Sunday. When it's this chilly (and windy) I don't really have desire to go anywhere or really do anything...well, anything super productive, that is. Of course I logged into Pinterest and started to poke around to see what I could find in terms of recipes. Then, I found this:


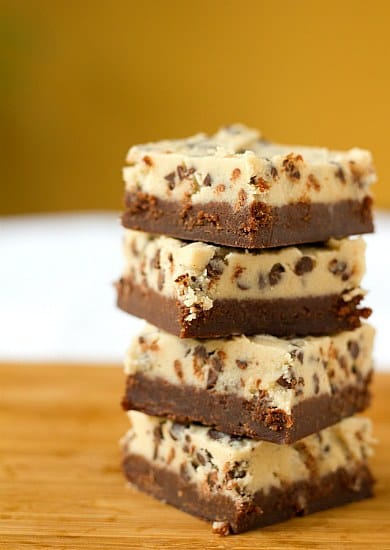
It's called "Chocolate Chip Cookie Dough Brownies".....OMG. 

Must. Make. NOW. 

So, I instantly repinned it then went onto the actual hosting site where the recipe is, which is called Brown Eyed Baker. The gal has a slew of drool worthy recipes, but my main focus was the cookie dough brownies. I mean, come on, you know you've eaten a fair share of cookie dough in your life at one point or another. 

Chocolate Chip Cookie Dough Brownies
Yield: 32 brownies
Prep Time: 40 minutes | Bake Time: 25 minutes
For the Brownie:
4 ounces unsweetened chocolate, finely chopped
1 cup unsalted butter, at room temperature
2 cups light brown sugar
4 eggs
2 teaspoons vanilla extract
1 cup all-purpose flour

For the Cookie Dough:
¾ cup unsalted butter
¾ cup light brown sugar
¾ cup granulated sugar
3 tablespoons whole milk
1½ teaspoons vanilla extract
1½ cups all-purpose flour
1½ cups mini chocolate chips

1. Prepare the Brownies: Preheat oven to 325 degrees F. Line a 9×13-inch pan with foil, with enough to hang over all four sides. Butter the foil. In a medium glass bowl, melt the chocolate in the microwave in 30-second increments, stirring after each, until melted and smooth. Set aside to cool slightly. In a large mixing bowl, mix the butter and brown sugar with an electric mixer on medium speed until light and fluffy. Beat in the eggs and vanilla extract, scraping the bowl as needed. Mix in the melted chocolate until combined. Reduce the speed to low, add the flour and mix just until combined (don’t over-mix). Spread the batter into the prepared pan. 

Bake 25 to 35 minutes, or until a toothpick inserted into the center comes out clean. Let cool completely.

2. Prepare the Cookie Dough: In a medium bowl, use an electric mixer on medium speed to combine the butter and both sugars. Add the milk and vanilla and mix until combined. Reduce the speed to low and mix in the flour just until combined. Using a rubber spatula, stir in the chocolate chips.

3. Spread the cookie dough over the cooled brownies. Refrigerate until the dough is firm, about an hour. Use a sharp knife or a pizza cutter (my favorite way to slice brownies!) to cut the brownies. Store the brownies in an airtight container at cool room temperature or in the refrigerator.

It looks and smells AWESOME! Although, after making it..I wasn't hungry anymore. Does that happen to you? The entire time you're cooking, you're hungry...then you're not hungry once the food is ready. Kind of annoying. I'm sure we'll test it out later this evening, though :)


Saturday, April 2, 2011

Mini "Pecan" Pies

I find it rather funny that I'm doing a post for mini pies / cookies right after a post regarding my weigh-in..LOL

Yesterday, Eric and I attended a get together on base to play some Bunco. That in itself it a whole other story, but we had a BLAST! To go to the event, you were asked to bring some sort of dish since it's like a potluck / game night sort of thing. Since it seemed like everyone was making hearty meals, I decided to go ahead and make "Mini Maple Cashew Tarts". I've made 'em before and they're pretty much amazing since they taste like baby pecan pies. You can't go wrong with 'em. Plus, they seemed to be a good hit with the ladies last night :)

Now, I'm giving you ingredient amounts to make twelve tarts. The pictures showing how to make the tarts show a quadruple amount since I had to make much more than twelve :)

Prep Time: 20 minutes
Total Time: About 1 hour, 40 minutes
Yield: 12 mini tarts


1 cup of salted cashews
2 eggs
1/2 cup packed dark brown sugar
1/2 cup pure maple syrup (DO NOT use maple flavored pancake syrup)
1 tbsp butter, melted
1 tsp Double Strength Vanilla
1 package of refrigerated pit crusts, softened according to package directions 
Preheat oven to 375*


Coarsely chop cashews with Food Chopper.


In Classic Batter Bowl, combine eggs, brown sugar, 1/3 cup of the maple syrup, butter and vanilla. Whisk with Stainless Whisk until smooth.


Stir cashews into egg mixture; set aside.


  Unroll one pic crust onto Pastry Mat. 


Using wide end of the clear Food Chopper collar, cut out six pastry circles. (Circles will measure 3 1/4 in. / 9.5cm. Discard remaining dough.) Pinch edges of circles inward at 1/2 inch intervals, creating ruffled shells.


Place shells into Muffin Pan wells; repeat with remaining pie crust. I obviously didn't do that since it's rather time consuming, so it's up to you if you wanna make them with ruffled edges. Stir cashew mixture until combined; pour evenly into shells until two-thirds full. Bake 18-20 minutes or until shells are golden brown.

 
Remove pan from oven to Stackable Cooling Rack; cool completely. Brush tops of tarts with remaining maple syrup.

Wednesday, November 17, 2010

Desserty Goodness

I could've sworn that I posted these recipes on here before..but after trolling through my blog several times to locate 'em, I realize that I posted them as Notes on my FB rather than on here. Opps! Oh well, here they are :) 

Pumpkin-Maple Cream Trifle


Prep Time: 25 Minutes
Total Time: 4 hours, 30 minutes
Yield: 24 servings

Ingredients:

Maple Walnuts
1 box of whole graham crackers
1/2 cups plus 3 tbsp pure maple syrup (do NOT use maple-flavored pancake syrup)
1 package of cheesecake or vanilla instant pudding and pie filling
1/2 cup milk
1 can solid packed pumpkin
2 tsp Cinnamon Plus Spice Blend
1 container frozen whipped topping, thawed, divided

Directions:

1. Prepare Maple Walnuts, if desired; set aside. Coarsely break graham crackers into Stainless 6qt. Mixing Bowl. Place 1/2 cup of the maple syrup in Small Batter Bowl; microwave on HIGH 60-90 second until hot. Pour hot syrup over crackers; toss to coat and set aside.

2. For pumpkin filling, combine pudding mixture and milk in Stainless 4qt Mixing Bowl; whisk until mixture begins to thicken. Add pumpkin and spice blend to pudding mixture; whisk well. Fold 2 cups of the whipped topping into pudding mixture; set aside.

3. For maple cream, combine remaining 3 tbsp of maple syrup and remaining whipped cream topping in Stainless 2qt Mixing Bowl; fold gently.If you want, you can attach the open star tip to Easy Accent Decorator; fill with 2/3 cup of maple cream and set aside for garnish.

4. To assemble trifle, place one-third of the graham cracker mixture over the bottom of the Trifle Bowl. Top with half of the pumpkin filling, spreading to the edges. Top with another third of the graham cracker mixture. Top with the remaining maple cream, spreading to edges. Top with remaining graham cracker mixture and pumpkin filling.

Cover; refrigerate 4 hours or overnight. Garnish with Maple Walnuts, if desired, and pipe with reserved maple cream. Sprinkle with additional spice blend, if desired.

** To make Maple Walnuts **
Combine 2 tbsp of butter and 3 tbsp of pure maple syrup in 10 inch Saute' Pan. Stir over medium heat until butter is melted. Add 1 cup of walnut halves and cook, stirring constantly, 5-7 minutes or until walnuts are completely browned. Spread walnuts in a single layer on wax paper; cool completely.
 

Apple-Cherry Crisp


This cheery dessert is made with ingredients that you may already have on hand.

Prep Time: 20 minutes
Bake Time: 35-40 minutes

Fruit Filling:

6 medium Granny Smith apples, sliced
1 can (21 ounces) cherry pie filling
1/2 teaspoon Pantry Korintje Cinnamon

Streusel Topping:

1/4 cup of 70% vegetable oil spread, melted
1/4 cup sliced almonds, chopped
1 cup old fashioned or quick oats
1/4 cup all-purpose flour
1/4 cup packed brown sugar
1/2 teaspoon Pantry Korintje Cinnamon
Fat-Free vanilla frozen yogurt (optional)

1. Preheat oven to 375*F. For fruit filling, peel, core and slice apples using Apple Peeler / Corer/ Slicer. Cut apples in half. Combine apples, pie filling and cinnamon in large Colander Bowl, mix gently. Spoon filling into Deep Dish Baker.

2. For streusel topping, place vegetable oil spread in Small Micro Cooker. Microwave on HIGH 45-60 second or until melted. Chop almonds using Food Chopper. Add almonds, oats, flour, brown sugar and cinnamon to micro cooker; mix well. Sprinkle topping evenly over fruit filling.

3. Bake 35-40 minutes or until apples are tender. Cool slightly. Serve warm topped with frozen yogurt, if desired.

Nurtients per serving: 280 Calories (24% from fat), Total Fat 8g, Saturated Fat 1.5g, Cholesterol 0mg, Carbohydrates 51g, Protein 3g, Sodium 70mg, Fiber 4g

Black Forest Trifle


Ingredients:
1 pkg (18-21 oz) brownie mix (plus ingredients to make cake-like brownies)
2 bars (1.55 ounces each) milk chocolate candy, divided
3 cups cherry pie filling
1 tsp almond extract
1/2 cup cranberry-cherry juice
2 cups cold 2% milk
2 pkg (3.3 oz each) white chocolate instant pudding and pie filling
1 container (8 oz) frozen whipped topping, thawed

Directions:

1. Preheat oven to 350°F. Prepare brownie mix according to package directions for cake-like brownies; spread batter over bottom of Large Bar Pan. Bake 18-20 minutes or until wooden pick inserted in center comes out clean. Cool completely.

2. Loosen brownie from sides of bar pan and invert onto flat side of Large Grooved Cutting Board. Cut brownie into 1-in. cubes; set aside. Chop 11/2 of the chocolate bars using Food Chopper. Reserve remaining chocolate for garnish.

3. Combine pie filling and almond extract in Small Batter Bowl; set aside 1/2 cup for garnish. Stir juice into batter bowl.

4. Pour milk into Classic Batter Bowl; add pudding mix and whisk until mixture begins to thicken. Fold in whipped topping.

5. To assemble trifle, place half of the brownie cubes into bottom of Trifle Bowl. Layer with half of the pie filling mixture. Sprinkle with half of the chopped chocolate; top with half of the pudding mixture. Repeat layer one time.

6. Make chocolate curls with reserved chocolate using Vegetable Peeler (see Cook's Tip). Garnish top of trifle with reserved pie filling mixture and chocolate curls. Refrigerate at least 30 minutes before serving.

Yield: 16 servings

Nutrients per serving: Calories 380, Total Fat 14 g, Saturated Fat 5 g, Cholesterol 45 mg, Carbohydrate 59 g, Protein 4 g, Sodium 300 mg, Fiber 0 g

Cook's Tips: To make chocolate curls, hold the Vegetable Peeler across the short side of the chocolate bar. Using even pressure, push the blade away from you to create curls.

This trifle can be assembled several hours before serving, or even the night before. 
 

Maple-Cashew Mini Tarts


Prep Time: 20 minutes
Total Time: About 1 hour, 40 minutes
Yield: 12 mini tarts

1 cup of salted cashews
2 eggs
1/2 cup packed dark brown sugar
1/2 cup pure maple syrup (DO NOT use maple flavored pancake syrup)
1 tbsp butter, melted
1 tsp Double Strength Vanilla
1 package of refrigerated pit crusts, softened according to package directions

Prepare Filling:

1. Preheat oven to 375*. Coarsely chop cashews with Food Chopper. In Classic Batter Bowl, combine eggs, brown sugar, 1/3 cup of the maple syrup, butter and vanilla. Whisk with Stainless Whisk until smooth. Stir cashews into egg mixture; set aside.

Form Pastry Shells:

2. Unroll one pic crust onto Pastry Mat. Using wide end of the clear Food Chopper collar, cut out six pastry circles. (Circles will measure 3 1/4 in. / 9.5cm. Discard remaining dough.) Pinch edges of circles inward at 1/2 inch intervals, creating ruffled shells. Place shells into Muffin Pan wells; repeat with remaining pie crust.

Fill Shells & Bake:

3. Stir cashew mixture until combined; pour evenly into shells until two-thirds full. Bake 18-20 minutes or until shells are golden brown. Remove pan from oven to Stackable Cooling Rack; cool completely. Brush tops of tarts with remaining maple syrup.