Friday, November 18, 2011

My sickness....has returned....

Ahhhhh...this that time of year when the Christmas markets around Europe return! When the Christmas markets pop up, that means I'm able to get some pretty bitchin' blown glass ornaments for my tree.  Today was the opening day for Aachens WeihnachtsMarkt (here's posts from the FIRST and SECOND time I've attended) and it was everything I was expecting! Although, it seems like they spread out the vendors more than last year, but the majority of the same people I bought from were still there. In fact, a lady I bought my Jim Shore animal Christmas statue from two years ago (and last year) remembered me! How cool is that? I guess I leave a lasting impression? :)

Anyway, I made a straight shot for my favorite vendor, Inge's Christmas Heirlooms, who sells blown glass ornaments:


I have a thing about collecting glass ornaments for our tree of various places we've visited, or things that remind me of important events...so at this point, the Christmas tree looks like a massive passport stamp cause it's got stuff from all over on it. Last year, I bought what I considered "Big Ben", but when I showed it to Eric, he said it looked like the bell tower in our town. Now every time I look at it, I don't think of our trip to London...I think of my town center, lol. If only I could find a blown glass pear, then I'd be a happy camper! My town is "Peer" but it's pronounced like "Pear"..and our town mascot is a dude hugging a pear, lol. It seems impossible to find one as a glass ornament!!!

Since Eric and I went to the market together today, I was able to get his opinion on which ornaments to pick up since I didn't wanna pick out something (again) and get my happy bubble popped. Here's what we ended up getting:

There is NO freaking way this can get mistaken for something in my town! It's Santa dressed up as a Royal Guard standing next to Big Ben! I was torn between this or an iconic red phone booth, but this pleased Eric since it has two alarmingly obvious things that symbolize London!


 We've been doing quite a bit of traveling this year, so I thought it was father fitting to get some luggage ornaments. The white one is mine while the red is Erics:


Of course, since we have out newest fur baby addition to the family, I wanted to add another puppy to the mix for the tree:


I meant to get one of these last year, but by the time I made it back up to the market to snag one, they were sold out :( It's a Lebkuchen cookie (kinda like gingerbread) that says "For You" ..makes me think of my Grandma cause she got them for me when I was little :) There was one we kept in our house for YEARS that said " Ich liebe dich", which means "I love you".


 And this...is my FAVORITE this year!! When I saw it, I said "OH MY GOD. This is coming home with me!" ...totally PERFECT since I love taking pictures and I really wanna hone my skills! I showed it to Eric and he said the same thing. How cool is this??? And it was VERY reasonably priced compared to some of the simpler ornaments they had. 


I'm still on a mission to find an Eiffel Tower as well as an Edelweiss to add to my collection, although for some reason, they're really hard to find! Given, there's eBay and what not..but some of the people on there are asking ridiculous prices for some of those things! Oh well, I have several more weeks of various Christmas markets to explore, so, fingers crossed!!

Photobucket

Wednesday, November 16, 2011

Tagine Test Drive

 As you read in my last post, I picked up a Tagine from Le Creuset and I was really itchin' to try it out! So, I scoured the internet earlier today and figured out what kinda recipes I wanted to try, wrote down all the ingredients and made my way over to the store. Here's the recipe I found:


3 medium carrots, peeled and cored (if core is bitter) and sliced in half lengthwise
6 chicken thighs, in 1 inch pieces
1 large peeled potato, cut in 1 cm thick rounds
1 large green bell pepper, cut in chunks
1 medium red onion, cut in 1 cm thick rounds
2 medium tomatoes, cut in 1 cm thick rounds
2 cloves garlic, sliced
2 tsps ground ginger
?? tsp ground pepper
2 tsps paprika
Dash of yellow food colorant powder, or a few strands crushed saffron
cube or 1 tsp chicken bouillon powder
1-2 tsp salt (to taste)
Handful of pitted green olives
6 -8 tbsp olive oil
1/4 cup of water

Splash 4 tbsp of oil on the bottom of the Tagine. Layer your ingredients evenly in the Tagine, starting with carrots, then going in order they are written. The carrots must be on the bottom, and the chicken pieces should be on top of the carrots, not touching the bottom of the Tagine (When the carrots start to burn, they add a delicious flavor and protect the rest of the ingredients, but if anything else burns, that's not going to taste very good.)  When you get to the spices and salt, sprinkle them evenly over the vegetables.  Spread your olives on top, then drizzle the olive oil allover. If water is needed, add it now. Close your Tagine and cook until your vegetables are tender, on a very low heat. This may take up to an hour andmake sure you have liquid in the Tagine or it will burn. On the other hand, watch out for too much liquid or it will bubble over.Once it's cooked, turn off the heat and drizzle the rest of your olive oil on top. Let the tagine rest for about 10 minutes to cool off, and enjoy!

Of all the spices, I've never worked with Saffron, which is a VERY potent and widely used in European, Arab, South and Central Asian, Persian, and Turkish cuisines. A little goes a LONG way! So, I was pretty nervous to use it since it's really unfamiliar to me...not to mention, EXPENSIVE! No joke, I paid $10 for a few GRAMS of it. I definitely didn't want to screw this meal up! Some things I altered were the olives..the commissary didn't have any plain green olives that were pitted, so I picked up some that had jalapenos in them (a lil spice isn't a bad thing), and instead of using powdered ginger, I used fresh minced stuff that's from Gilroy, CA (twenty five minutes from my home town). Oh, and I didn't have chicken readily available without having to defrost it like crazy, so I used a schwank roast that was already available to be used :)

 So, I set to the task of chopping everything up like usual...once all the veggies and meat were ready to put in the Tagine, I layered 'em up as the recipe stated. To be honest, I was a little worried about how it looked like I was stacking and sticking stuff on top of one another...so it felt like parts of the food weren't going to get cooked properly. Just what I need..give my family some kind of food poisoning when I was trying to convince them to "broaden their horizons" when it came to tasting new things, lol. Once I finished stacking and adding the seasoning, I put the lid on and walk away. 

Here's the before:


Anddddd after:


I was honestly SHOCKED as to how much the liquid level raised and everything was so tender within an hour of cooking! The stove top was set on low! This thing is basically a super crock-pot! So, I was pleasantly surprised and Eric was even impressed with how everything turned out. It tasted FANTASTIC! The seasonings and veggies melted together perfectly and the sauce didn't taste like some watered down broth. When we were ready to dig in, we had some white rice available and piled some of this on top..Uh-mazing! I'm in love with this thing and look forward to using it a lot more :) Definitely a worth while investment since my husband AND son were raving about the recipe and how everything came out!

Photobucket

Tuesday, November 15, 2011

Date Day @ Le Creuset

It's pretty humbling to think that this time last week, I was still relaxing in California..and now here I am in Belgium and already venturing around again. Honestly, I definitely appreciate that I'm even able to do this! 

My amazing husband managed to take some well deserved time off when I came back, so we're wanting to take advantage of it! Later this month, I'll be heading to the Le Creuset factory outlet store over in France with a group of gals since it'd be pretty cool to get it straight from them verses a retail store, if that makes any sense. Well, Eric was actually really interested in going, but not with a group of women since he'd be the only guy... and he's not one for being in a hen house, lol. We were planning on going over to Chièvres, which isn't too far from the border of France, so we figured we'd go the extra hour and a half distance to actually go into that country to check out Le Creuset. I see it as not only spending time with Eric, but it's like I'm doing "intel" for the other gals who are going on the trip later this month in terms of finding out pricing, what's available in the shop, ect. And...I'll be able to get familiar with the area so when I do the drive again, I won't get so lost :) See? Win win.

The Le Creuset is located in Fresnoy-le-Grand, France, which has a pretty massive factory. There are rumblings that a second factory for the company is being built per some Le Creuset employees I've talked to during my purchasing adventures. 

Photo provided via Le Creuset 

In case you don't what Le Creuset is..let me explain. They make some of the most fantastic cast iron cookware, ever, and that's what they're known for. The company was founded in 1925 (86 years ago!!) and is still going strong. My grandmother actually has a piece of theirs which she got in 1947 and it still works AND looks amazing! Now, I'm psychotic about having nice cookware in my kitchen (Hi. I'm Pampered Chef  consultant and my kitchen is PIMPED out)...so as time as rolled on, I've collected a few little pieces here and there from Le Creuset. Eric is a loving and supportive husband, so when I told him that I wanted to get a few Le Creuset pieces, he didn't bother asking why since he knew I had already done all the research...and basically that I was a woman on a mission till I got what I was looking for. 

So, we made our way over to France bright and early since I figured out the store was open for a few hours in the morning, closed for lunch, then re-opens back in the afternoon. It takes just a wee bit over three hours to get there and the first hour and a half was spent in Brussels traffic (ick). Once we got past there, it was pretty smooth sailing for most of the remainder of the drive:


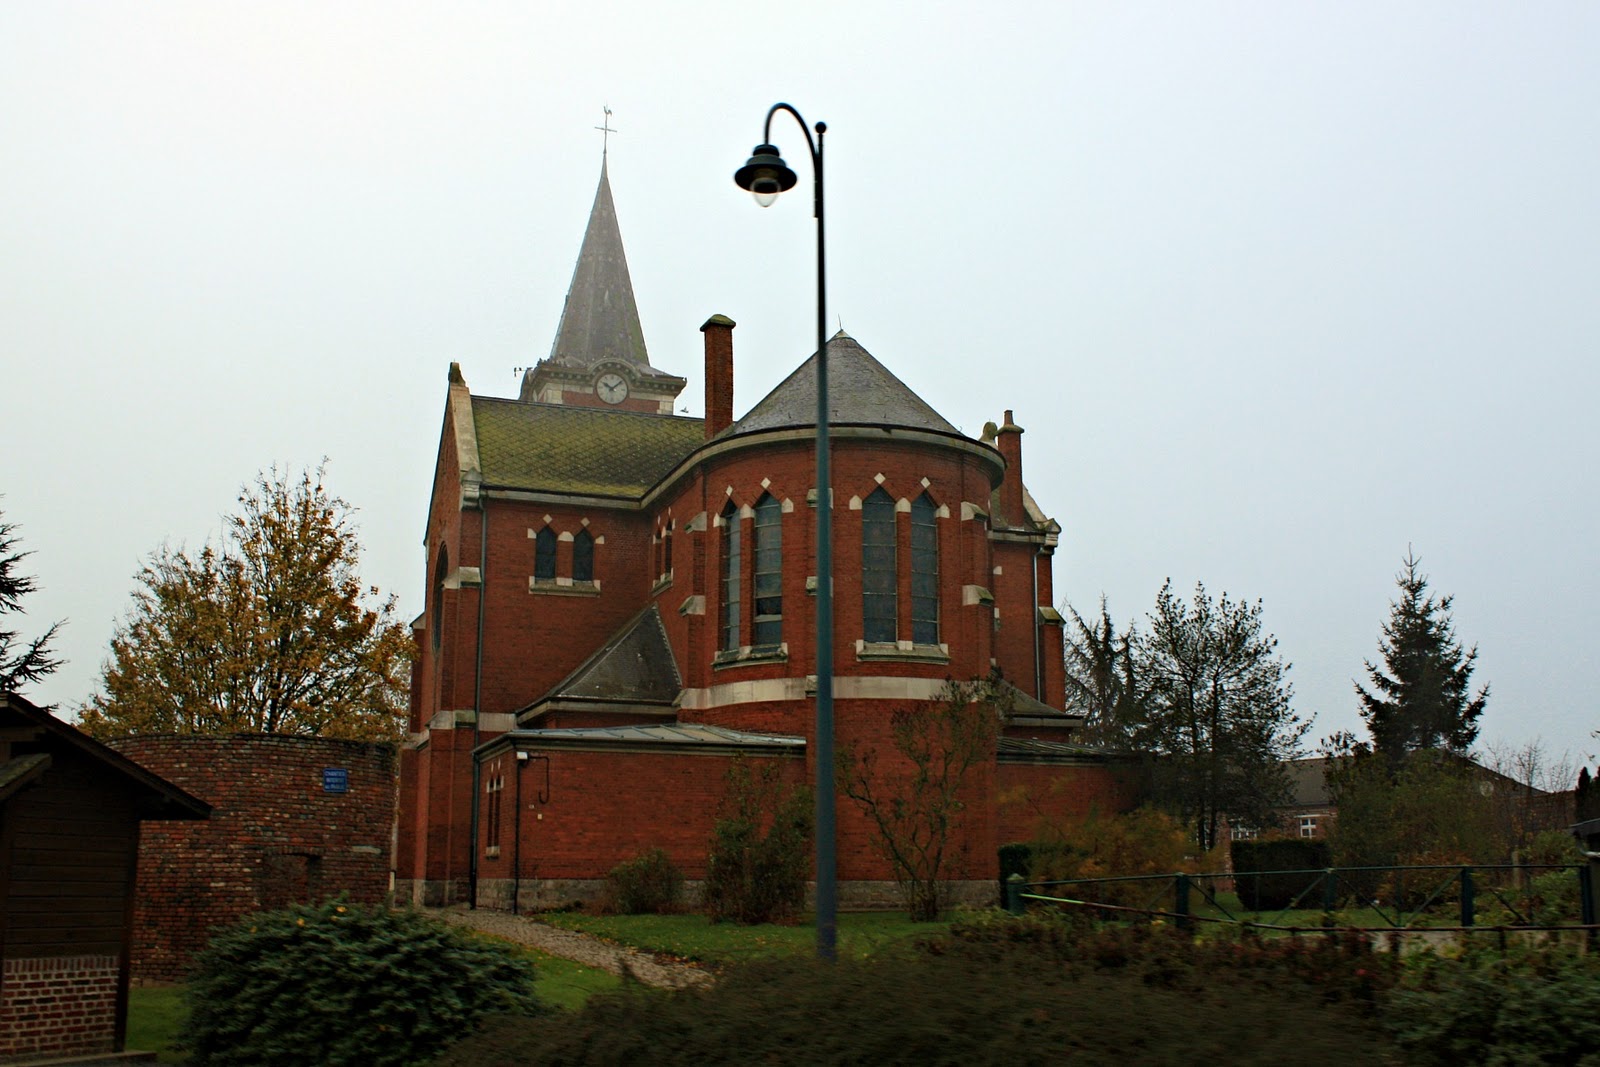
The sites along the way were pretty cool! We drove through numerous little French villages ....we even passed by several bunkers that looked like they lived through some history. There were even some really interesting churches along the way, but we didn't have a chance to stop since the French seem to enjoy drafting our Xterra and there really wasn't anywhere we could pull off to in order to allow people to pass. Le sigh.


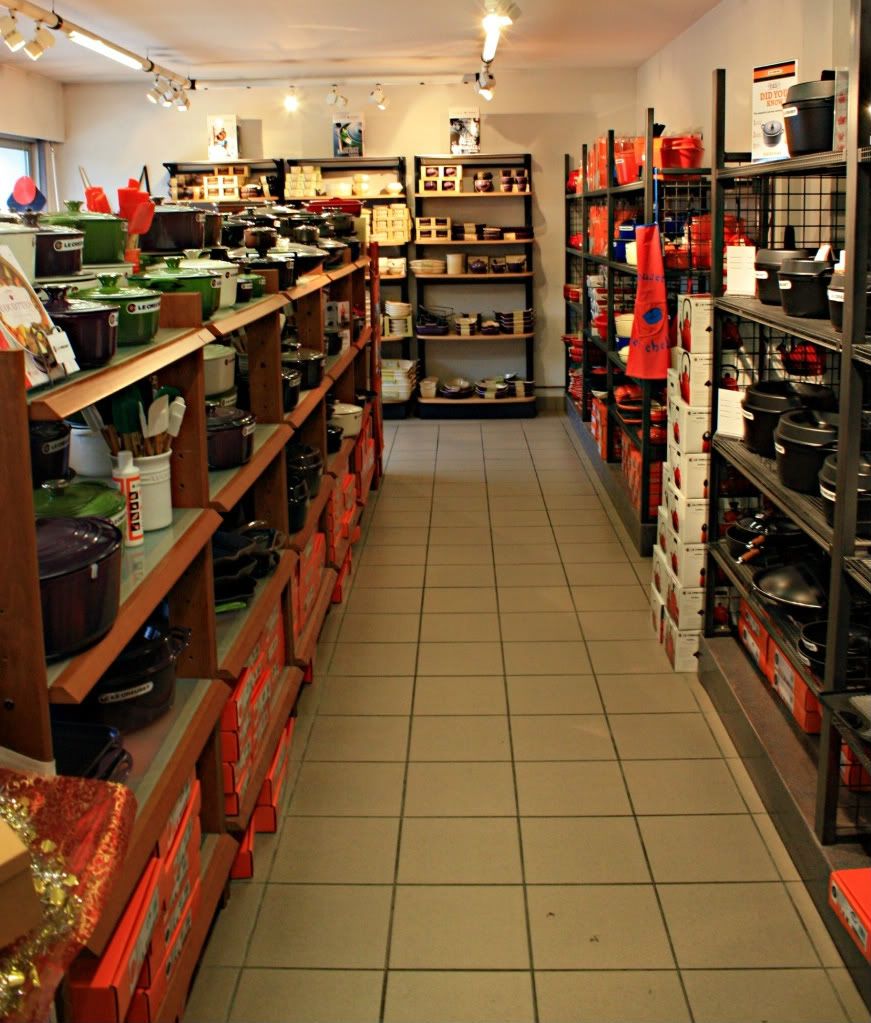
Once we found the outlet, I was kinda surprised by how small it was. I mean.. I knew in the back of my mind that it was small, but not as small as it actually is considering it's RIGHT next to the factory. 


For those interested in visiting the Le Creuset Outlet here is the address & hours as of today's date:
Rue Olivier Deguise, 02230 Fresnoy-Le-Grand, France.    
Tel 03.23.06.22.45 
Hours: Closed Monday & Sunday. Tuesday-Saturday 10-12:30 & 2:15-6:30

As long as you're walking in without a specific color / particular thing in mind...you'll be perfectly fine in there. The majority of the colors they had available in their cast iron stuff was black, red, blue, flame, a few pieces of yellow as well as eggplant here and there.


When you first walk in, they have a table on the left that shows off what they currently have a promotion for. This month, if you buy any of the "Ocean Blue" colored items, they'll take 20% off of it for ya. I actually thought of one of my friends since this is TOTALLY a color she'd go for. In fact, I think this is one of the colors she picked in our pottery class to glaze the goodies she had made.


 One aisle has all the main cast iron goodies like oval and circular dutch ovens, frying pans, doufeu's, woks, etc.


 They also carry silicone pans for muffins, cakes, loafs, even muffin liners and colanders! 


Throughout the store (but mainly in the very back) they have a collection of stoneware to pick from. Like I said, if you don't have a particular color in mind...that will totally work in your favor. The color varieties ranged from off white, to eggplant, red, flame, black and a mossy green color. It just really depends on what they have available at the time when you go. 


In the other aisle, you can check out various tea kettles as well as mini little stoneware pieces you can use for little desserts, etc. Lots of colors available in those!


Tagines!


Aside from all the standard cookware stuff, they also have kitchen tools available like wine accessories, silicone spreaders, whisks, trivets, even little magnets for your fridge that look like baby cast iron dutch ovens.

While walking around and figuring out what I wanted, I found a price sheet that they had readily available for people to use rather than to lift up each individual piece to check the price on the bottom. Tell ya what, that thing was a blessing cause after lifting the fourth or fifth piece of cash iron, it gets a little tiring. Here's the price sheet I'm talking about.. the light orange is the price of the unit in the store, the white part is what the piece NORMALLY goes for, and the dark orange tells you how much you save. (If you click on the picture, it'll enlarge so you can see the prices better)


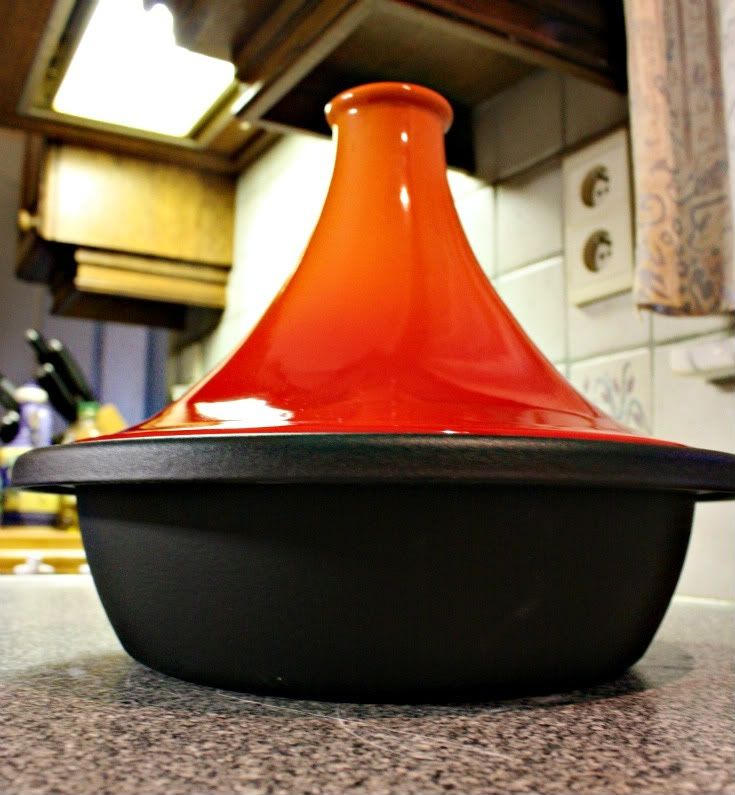
Once we got our fill from looking around and debating, we ended up getting a 2 quart.Tagine in "Flame".  If you don't know what a Tagine is, here ya go: http://en.wikipedia.org/wiki/Tajine Also, here's a little video on how to use one:


I've been pretty interested in getting one for a while since I'm wanting to expand my cooking arsenal with different types of recipes aside from all the usual stuff I made. Eric was even open to trying new things, so hell, why not get a Tagine :) We both agreed on "Flame" since Dune (a bone white color) was a little boring, and the Caribbean Blue isn't available in the size we wanted. The gal that helped me was FANTASTIC! When we told her what we were wanting, she went in the back and pulled out a box since all the big items are pretty much displays...she pulled the Tagine out and checked it for dings, imperfections and whatever else could possibly be wrong, showed it to us them boxed it back up for us to take home :)


I love how large it is! The bottom holds up to 2 quarts of whatever deliciousness you wanna cook, and as you can see, it's pretty deep so you don't have to worry about it overflowing onto your stove top. 


The top is made of stoneware while the bottom is cast iron..all together, it weighs around 7lbs.


Price wise.....errrrrmmmm... it's not all that much cheaper than what you can get in a regular retail store, at least in the US. When I was in the Le Creuset outlet in Gilroy, I manged to get my 7.75 quart round dutch oven for $115 (originally $280), a sauce pan for $75 (originally $170) and an awesome pepper grinder for $20 (originally $60). When I did the conversion rate for what I paid for my Tagine from the factory, which was 119€, it comes out to $160.65...about a $15 savings compared to what the going rate is online. Then, add in the cost of gas round trip (which is 80€)...it kinda took away the feeling of "saving on the price" by getting it directly from the store in France verses getting it on Amazon (which offers free shipping). I suppose it just depends on what you're really looking for since you can get better savings on certain items, but, it still ends up being pricier than anticipated and how much you really wanna dig. 

Overall, it was a beautiful drive around France in the process of finding this store..it was something Eric and I got to do together in addition to helping me figure out how to get there for the next time I'll be driving some ladies to the store. Now I just gotta find some cookbooks for Tagines as well as other cast iron dutch ovens...'tis the season for hearty soups!! :D
Photobucket

Saturday, November 12, 2011

Stefanie Elizabeth Photography

In case you missed it, I talked about a photoshoot (here), that Stefanie was gonna come up and do for me since I was really wanting to get some "Father & Daughter" style pictures done with my Dad. Well, she came this weekend and I was SO grateful , especially since I'm flying home in a few days!! 

If you ever look up pictures of Monterey, 90% of the time...you'll see Cypress trees. Hell, even the seal for Monterey County has a Cypress tree on it! So, it's not really a shocker that Dad and I wanted to have Cypress trees in our pictures since we both really love the coastline as well as the local trees:


There's a pendant that I'm almost always wearing that's a Cypress tree. Can you tell I'm rather fond of this place? Although, half the time people think it's a Bonsai tree...lol 


We went over to 17 Mile Drive, which is a VERY famous part of Monterey / Pacific Grove / Carmel here in gorgeous California. Think in terms of an amazing coastline, breath taking landscapes, Cypress trees growing on cliffs...and bazillion dollar mansions! Boy, they made me feel reallllly poor....but at least we were able to enjoy some fantastic sights while getting our pictures done! 


The Lone Cypress behind Dad:


Stef thought this would be a great shot while we were relaxing at Johnny Rocket's in Cannery Row:


Tell ya what...walking on rocks in heels should be a right of passage for some people. 


Overall, I'm VERY happy with how the pictures turned out. Although, after seeing myself...totally makes me wanna get back in the gym, lol. Stefanie did a fantastic job with the shoot and made it very VERY enjoyable for my Dad and I. So, if you live in the Santa Maria (California) area..definitely look her up!  


Photobucket

Wednesday, November 2, 2011

Curlformers 2.0

"I busted out my awesomeCurlformers since I KNEW Stef was gonna fall inlove with them. I've attempted several times to do them in my hair, but I'm "girly challenged" and have a hell of a time when it comes to putting them in...sooo I got some practice in with Stefs hair :) 


Instead of me attempting to remotely explain (correctly) how to use these, here's a video by the actual company:


I spent about an hour putting them in Stefs hair since hers is SO thick (lucky!)...this is how they turned out the next morning since she left 'em in all night long:

Awesome, right?? 


I ended up using the curlers on my hair this morning, but the results didn't come out as awesome as Stefs. Oh well, at least I got some volume! lol


After:


Ok, so I did that blog entry on the 15th of October. I actually ended up giving Stefanie that set of Curlformers because she REALLY loved 'em. Think in terms of her hugging them all. Yeah. LOVE. Anyway, since my hair is so thin, I figured I should try to switch over to "Long & Extra Wide" Curlformers to try to make thicker curls :


In case you're confused as to how different my " Long and Extra Wide" curlers are compared to the "Extra Long & Wide"...here's a fabulous example to show the various sizes:


Short and Narrow (blue and green)
Long and Extra Wide (yellow and magenta)
Long and Narrow (blue and green)
Extra Long and Wide (pink and orange)


Mine are the yellow and magenta color :)

So, I did the whole song and dance with putting all the curlers in my hair before I went to bed. I'm REALLY not used to doing this sort of thing, especially on my own..so it was definitely a "learn as you go" type of experience:


Here's how it looks from side to side:


When I walked around the house with them on, I was called all kinds of names...like "Rasta Erika" or even "Coolio"...I'm pretty sure my Dad was getting a massive kick outta them! Truth be told, they're REALLY not comfortable to sleep in! They feel like a stiff seat belt material, so it was hard to find a way where I could drift of to sleepy land without them pulling my hair really bad. Despite all my effort to sleep well..it just wasn't possible so I got up at 3am to take 'em out, but this is how my hair looked after having the Curlformers in for seven hours:


Not too shabby, hunh? Thicker curls and it added more volume to my hair, which is desperately needed! Yes, I have some crazy roots showing, but I managed to get my hair touched up yesterday..but I took these pics a few days earlier :) PS: Apologies for the less than enthusiastic picture, lol. I was REALLY tired due to the lack of sleep / tossing & turning all night. 

All in all, these are very cool curlers! From now on, I think I'll put 'em in after a shower then I'll just lightly blow dry them into shape rather than waiting however long it takes hair to dry naturally (which is forever with me). 


Photobucket